Lesson 1: Let's get started
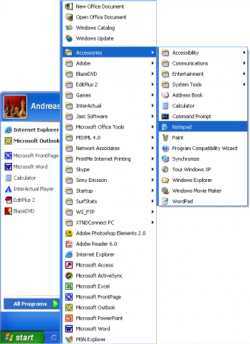
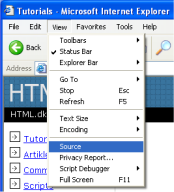
In this first lesson, you will get a brief presentation of the tools you need to make a website. What is needed? Most likely you already have everything you need. You have a "browser". A browser is the program that makes it possible to browse and open websites. Right now you are looking at this page in your browser. It is not important which browser you use. The most common is Microsoft Internet Explorer. But there are others such as Opera and Mozilla Firefox and they can all be used. You might have heard about, or even used, programs such as Microsoft FrontPage, Macromedia Dreamweaver or even Microsoft Word, which can - or claim that they can - create websites for you. Forget these programs for now! They are not of any help to you when learning how to code your own website. Instead, you need a simple text editor. If you are using Windows you can use Notepad, which is usually found in the start menu under Programs in Accessories: If you are not using Windows, you can use a similar simple text editor. For example, Pico (Linux) or TextEdit (Mac). Notepad is a very basic text editing program which is excellent for coding because it does not interfere with what you are typing. It gives you complete control. The problem with many of the programs that claim they can create websites is that they have a lot of standard functions, which you can choose from. The downside is that, everything needs to fit into these standard functions. Thus, this type of programs often cannot create a website exactly as you want it. Or - even more annoyingly - they make changes to your hand-written code. With Notepad or other simple text editors, you only have yourself to thank for your successes and errors. A browser and Notepad (or a similar simple text editor) are all you need to go through this tutorial and make your own websites. Do I need to be online? You do not need to be connected to the Internet - neither while reading this tutorial, nor while making your websites. If you want to avoid being online while reading this tutorial, you can either print it out or simply disconnect from the Internet while reading on screen. You can make the website on your computer's hard disk and upload it to the Internet when it is finished. What's next? Go to the next lesson and read about HTML before the fun really starts in Lesson 3. Lesson 2: What is HTML? This lesson will give you a brief presentation of your new friend, HTML. What is HTML? HTML is the "mother tongue" of your browser. To make a long story short, HTML was invented in 1990 by a scientist called Tim Berners-Lee. The purpose was to make it easier for scientists at different universities to gain access to each other's research documents. The project became a bigger success than Tim Berners-Lee had ever imagined. By inventing HTML he laid the foundation for the web as we know it today. HTML is a language, which makes it possible to present information (e.g. scientific research) on the Internet. What you see when you view a page on the Internet is your browser's interpretation of HTML. To see the HTML code of a page on the Internet, simply click "View" in the top menu of your browser and choose "Source". For the untrained eye, HTML code looks complicated but this tutorial will help you make sense of it all. What can I use HTML for? If you want to make websites, there is no way around HTML. Even if you're using a program to create websites, such as Dreamweaver, a basic knowledge of HTML can make life a lot simpler and your website a lot better. The good news is that HTML is easy to learn and use. In just two lessons from now you will have learned how to make your first website. HTML is used to make websites. It is as simple as that! Okay, but what does H-T-M-L stand for? HTML is an abbreviation of "HyperText Mark-up Language" - which is already more than you need to know at this stage. However, for the sake of good order, let us explain in greater detail. Hyper is the opposite of linear. In the good old days - when a mouse was something the cat chased - computer programs ran linearly: when the program had executed one action it went to the next line and after that, the next line and so on. But HTML is different - you can go wherever you want and whenever you want. For example, it is not necessary to visit MSN.com before you visit HTML.net. Text is self-explanatory. Mark-up is what you do with the text. You are marking up the text the same way you do in a text editing program with headings, bullets and bold text and so on. Language is what HTML is. It uses many English words. In this tutorial you will learn so-called XHTML (Extensible HyperText Mark-up Language) which, in short, is a new and more well-structured way of writing HTML. Now you know what HTML (and XHTML) stands for let's get started with what it is all about: making websites. |
|
Lesson 3: Elements and tags
You are now ready to learn the essence of HTML: elements.
Elements give structure to a HTML document and tells the browser how you want your website to be presented. Generally elements consists of a start tag, some content, and an end tag.
"Tags"?
Tags are labels you use to mark up the begining and end of an element.
All tags have the same format: they begin with a less-than sign "<" and end with a greater-than sign ">".
Generally speaking, there are two kinds of tags - opening tags: <html> and closing tags: </html>. The only difference between an opening tag and a closing tag is the forward slash "/". You label content by putting it between an opening tag and a closing tag.
HTML is all about elements. To learn HTML is to learn and use different tags.
Can you show me some examples?
Okay, the element em emphasis text. All text between the opening tag <em> and the closing tag </em> is emphasised in the browser. ("em" is short for "emphasis".)
Example 1:
***************************************************************
* *
* <em>Emphasised text.</em> *
* *
***************************************************************
Will look like this in the browser: Emphasised text.
The elements h1, h2, h3, h4, h5 and h6 is used to make headings (h stands for "heading"), where h1 is the first level and normally the largest text, h2 is the second level and normally slightly smaller text, and h6 is the sixth and last in the hierarchy of headings and normally the smallest text.
Example 2:
**************************************************************
* *
* *
* <h1>This is a heading</h1> *
* <h2>This is a subheading</h2> *
**************************************************************
_________________________
:Will look like this in the browser:
: This is a heading
: This is a subheading
:________________________
So, I always need an opening tag and a closing tag?
As they say, there's an exception to every rule and in HTML the exception is that there are a few elements which both open and close in the same tag. These so-called empty elements are not connected to a specific passage in the text but rather are isolated labels, for example, a line break which looks like this: <br />.
Should tags be typed in uppercase or lowercase?
Most browsers might not care if you type your tags in upper, lower or mixed cases. <HTML>, <html> or <HtMl> will normally give the same result. However, the correct way is to type tags in lowercase. So get into the habit of writing your tags in lowercase.
Where do I put all these tags?
You type your tags in an HTML document. A website contains one or more HTML documents. When you surf the Web, you merely open different HTML documents.
If you continue to the next lesson in 10 minutes you will have made your first website.
Lesson 4: Create your first website
With what you learned in the previous lessons, you are now only minutes away from making your first website.
How?
In Lesson 1 we looked at what is needed to make a website: a browser and Notepad (or similar text editor). Since you are reading this, you most likely already have your browser open. The only thing you need to do is to open an extra browser window (open the browser one more time) so you can read this tutorial and see your new website at the same time.
Also, open Notepad (in Accessories under Programs in the Start menu)
Lesson 4:

Now we are ready!
What can I do?
Let us start with something simple. How about a page that says: "Hurrah! This is my first website." Read on and you'll find out how simple it is.
HTML is simple and logical. The browser reads HTML like you read English: from the top down and from left to right. Thus, an simple HTML document begins with what should come first and ends with what should come last.
The first thing you need to do is to tell the browser that you will "talk" to it in the language HTML. This is done with the tag <html> (no surprises there). So before you do anything else type "<html>" in the first line of your document in Notepad.
As you may recall from the previous lessons, <html> is an opening tag and must be closed with a closing tag when you are finished typing HTML. So to make sure you don't forget the HTML close tag now type "</html>" a couple of lines down and write the rest of the document between <html> and </html>.
The next thing your document needs is a "head", which provides information about your document, and a "body", which is the content of the document. Since HTML is nothing if not logical, the head (<head> and </head>) is on top of the body (<body> and </body>).
Your document should now look like this:
*********************************************************************
* *
* <html> *
* *
* <head> *
* </head> *
* *
* <body> *
* </body> *
* *
* </html> *
*********************************************************************
Note how we structured the tags with new lines (using the Enter key) as well as indents (using the Tab key). In principle, it does not matter how you structure your HTML document. But to help you, and others reading your coding, to keep an overview, it is strongly recommended that you structure your HTML in a neat way with line breaks and indents, like the above example.
If your document looks like the above example, you have made your first website - a particularly boring website and probably not what you dreamt of when you started this tutorial but still some sort of a website. What you have made will be the basic template for all your future HTML documents.
So far so good, but how do I add content to my website?
As you learnt earlier, your HTML document has two parts: a head and a body. In the head section you write information about the page, while the body contains the information that constitutes the page.
For example, if you want to give the page a title which will appear in the top bar of the browser, it should be done in the "head" section. The element used for a title is title. I.e. write the title of the page between the opening tag <title> and the closing tag </title>:
****************************************************
<title>My first website</title>
****************************************************
Note that this title will not appear on the page itself. Anything you want to appear on the page is content and must therefore be added between the "body" tags.
As promised, we want the page to say "Hurrah! This is my first website." This is the text that we want to communicate and it therefore belongs in the body section. So in the body section, type the following:
*******************************************************
<p>Hurrah! This is my first website.</p>
******************************************************
The p in <p> is short for "paragraph" which is exactly what it is - a text paragraph.
Your HTML document should now look like this:
************************************************************
<html>
<head>
<title>My first website </title>
</head>
<body>
<p>Hurrah! This is my website.</p>
</body>
</html>
*************************************************************
Done! You have now made your first real website!
Next all you have to do is to save it to your hard drive and then open it in your browser:
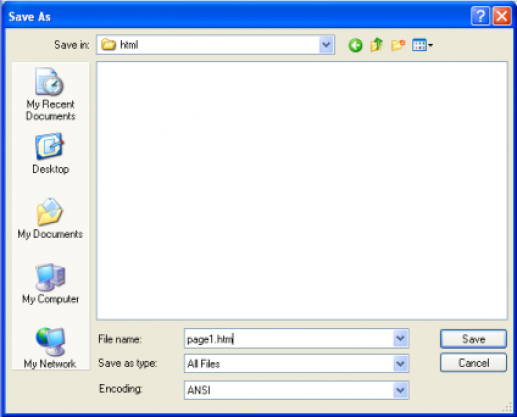
In Notepad choose "Save as..." under "File" in the top menu.
Choose "All Files" in the "Save as type" box. This is very important - otherwise, you save it as a text document and not as an HTML document.
Now save your document as "page1.htm" (the ending ".htm" indicates that it is an HTML document. ".html" gives the same result. I always use ".htm", but you can choose whichever of the two extensions you prefer). It doesn't matter where you save the document on your hard drive - as long as you remember where you saved it so you can find it again.
What can I do?
Let us start with something simple. How about a page that says: "Hurrah! This is my first website." Read on and you'll find out how simple it is.
HTML is simple and logical. The browser reads HTML like you read English: from the top down and from left to right. Thus, an simple HTML document begins with what should come first and ends with what should come last.
The first thing you need to do is to tell the browser that you will "talk" to it in the language HTML. This is done with the tag <html> (no surprises there). So before you do anything else type "<html>" in the first line of your document in Notepad.
As you may recall from the previous lessons, <html> is an opening tag and must be closed with a closing tag when you are finished typing HTML. So to make sure you don't forget the HTML close tag now type "</html>" a couple of lines down and write the rest of the document between <html> and </html>.
The next thing your document needs is a "head", which provides information about your document, and a "body", which is the content of the document. Since HTML is nothing if not logical, the head (<head> and </head>) is on top of the body (<body> and </body>).
Your document should now look like this:
*********************************************************************
* *
* <html> *
* *
* <head> *
* </head> *
* *
* <body> *
* </body> *
* *
* </html> *
*********************************************************************
Note how we structured the tags with new lines (using the Enter key) as well as indents (using the Tab key). In principle, it does not matter how you structure your HTML document. But to help you, and others reading your coding, to keep an overview, it is strongly recommended that you structure your HTML in a neat way with line breaks and indents, like the above example.
If your document looks like the above example, you have made your first website - a particularly boring website and probably not what you dreamt of when you started this tutorial but still some sort of a website. What you have made will be the basic template for all your future HTML documents.
So far so good, but how do I add content to my website?
As you learnt earlier, your HTML document has two parts: a head and a body. In the head section you write information about the page, while the body contains the information that constitutes the page.
For example, if you want to give the page a title which will appear in the top bar of the browser, it should be done in the "head" section. The element used for a title is title. I.e. write the title of the page between the opening tag <title> and the closing tag </title>:
****************************************************
<title>My first website</title>
****************************************************
Note that this title will not appear on the page itself. Anything you want to appear on the page is content and must therefore be added between the "body" tags.
As promised, we want the page to say "Hurrah! This is my first website." This is the text that we want to communicate and it therefore belongs in the body section. So in the body section, type the following:
*******************************************************
<p>Hurrah! This is my first website.</p>
******************************************************
The p in <p> is short for "paragraph" which is exactly what it is - a text paragraph.
Your HTML document should now look like this:
************************************************************
<html>
<head>
<title>My first website </title>
</head>
<body>
<p>Hurrah! This is my website.</p>
</body>
</html>
*************************************************************
Done! You have now made your first real website!
Next all you have to do is to save it to your hard drive and then open it in your browser:
In Notepad choose "Save as..." under "File" in the top menu.
Choose "All Files" in the "Save as type" box. This is very important - otherwise, you save it as a text document and not as an HTML document.
Now save your document as "page1.htm" (the ending ".htm" indicates that it is an HTML document. ".html" gives the same result. I always use ".htm", but you can choose whichever of the two extensions you prefer). It doesn't matter where you save the document on your hard drive - as long as you remember where you saved it so you can find it again.
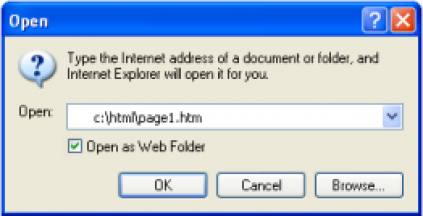
Now go to the browser:
In the top menu choose "Open" under "File".
Click "Browse" in the box that appears.
Now find your HTML document and click "Open".
It now should say "Hurrah! This is my first website." in your browser. Congratulations!
If you absolutely want the whole world to see your masterpiece right away, you can jump to Lesson 13 and learn how to upload your page to the Internet. Otherwise, be patient and read on. The fun has just begun.
If you absolutely want the whole world to see your masterpiece right away, you can jump to Lesson 13 and learn how to upload your page to the Internet. Otherwise, be patient and read on. The fun has just begun.
 |
It now should say "Hurrah! This is my first website." in your browser. Congratulations!
If you absolutely want the whole world to see your masterpiece right away, you can jump to Lesson 13 and learn how to upload your page to the Internet. Otherwise, be patient and read on. The fun has just begun. |
